Adding a new category
This guide explains how to create a new category from the Merchant app so that products can be grouped and shown correctly in the menu and billing screens.
Prerequisites
- You are logged in to the merchant app with a role that has permission to edit and manage Categories.
Step 1: Open the Add Category popup
- In the Inventory page, click the Base Menu tab if it is not already selected.
- Go to the Categories section from your Inventory.
- Click the Add Category button.
- The Add Category popup appears, as shown below.
Add Category form with all fields.
Step 2: Enter basic details
- In the Name field, enter the category name.
- This is a required field.
- Example:
Beverages,Starters,Desserts.
- In the Sort order field, enter a number to control where this category appears in the list.
- This is a required field.
- Lower numbers appear earlier in the menu.
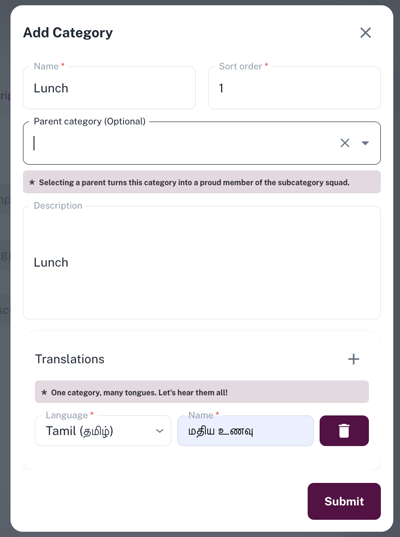
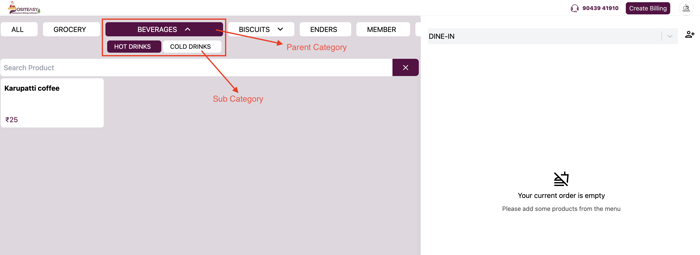
Step 3: Select parent category (optional)
- If this should be a subcategory, open the Parent category (Optional) dropdown.
- Select an existing parent category from the list.
- Selecting a parent turns this category into a subcategory.”
If you do not want this to be a subcategory, leave this field empty.
💡Note: Parent category will not contain any products associated with it. It can only have subcategories.
Step 4: Add description and translations (optional)
- In Description, type a short explanation for this category (for internal use or tooltips).
- In the Translations section:
- Click the + icon to add translations.
- Add category names in other languages if you need multi-language menus.

Step 5: Submit the category
- Click Submit.
- Confirm that:
- The category is available for selection when creating or editing products.
- The new category appears in the Categories list when you are adding a new product to the inventory.
Refer Add a new Product